REVIEW · AORAKI MOUNT COOK VILLAGE
Mount Cook: 3 Hour Heli Hike to the Tasman Glacier
Book on GetYourGuide →Operated by The Helicopter Line Mount Cook · Bookable on GetYourGuide
Glacier hiking starts with a helicopter ride. I love the smooth flight-to-ice setup, and I love the way guides like Kerry and Jess teach safe glacier movement during a 2-hour walk on the Tasman Glacier. You get big Southern Alps views without a long drive, plus that moment when the ice is right under your boots.
One wrinkle: weather can affect the day. The helicopter portion depends on favorable conditions, and if conditions are rough, you may get a more limited look at ice features than you hoped for.
In This Review
- Key things to know before you go
- Helicopter-to-ice in Mount Cook: what makes it different
- Mount Cook airport to the glacier: the flight portions and views
- The 2-hour heli hike: what the glacier walk feels like
- Guides, gear, and timing: where most of the value is
- Weather and how your ice experience can change
- Price and value: is $564 worth it?
- Who this heli hike is best for (and who should skip it)
- How to prepare so the day goes your way
- Photos and memories: what to aim for
- Should you book the Mount Cook 3-hour Heli Hike to the Tasman Glacier?
- FAQ
- How long is the Mount Cook heli hike to the Tasman Glacier?
- Where does the tour start?
- What’s included with the activity?
- Is the helicopter flight guaranteed?
- What should I bring and wear?
- Are drones or selfie sticks allowed?
Key things to know before you go
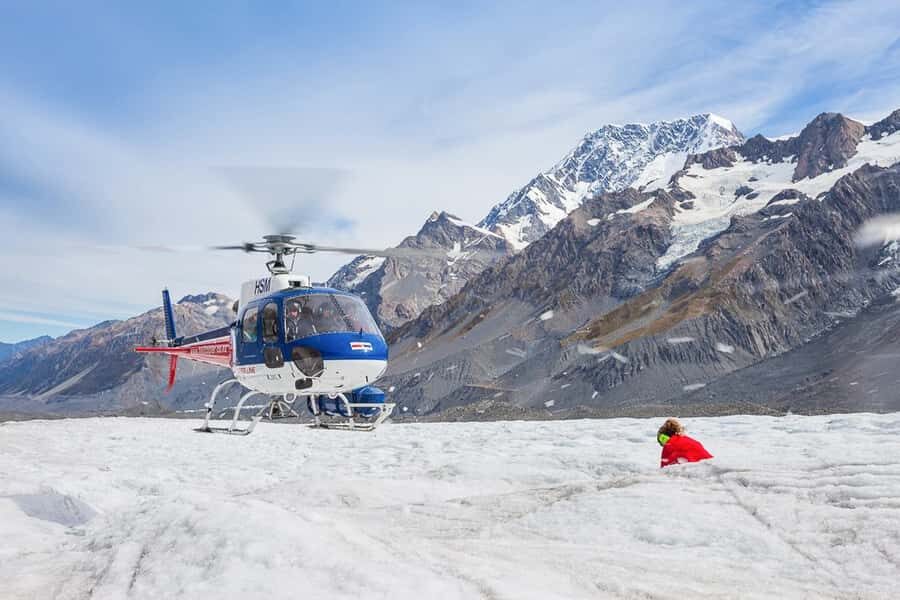
- Heli landing on the Tasman Glacier Lake region: you step out onto real glacial terrain, not a viewing platform.
- 2 hours on undulating ice: it’s active hiking time, not a short stroll.
- Guides run the safety system: crampons, boots, and guidance are taken seriously, fast.
- Return flight near Hochstetter Icefall: you get a close-up look from the air on the way back.
- Small group size (max 10): more personal attention during fitting and the hike.
- No drones or selfie sticks: your hands (and your balance) stay where they belong.
Helicopter-to-ice in Mount Cook: what makes it different
This is not a “watch glaciers from a bus stop” day. You start at Mount Cook Airport, take a scenic helicopter flight, and then land on the Tasman Glacier for an on-ice hike. In plain terms: you trade hours of trekking to reach ice for a few hours that feel like a real expedition.
The best part is the combination. The flight gives you the big-picture drama of the Southern Alps. Then the hike gives you the close-up reality: cracked ice textures, glacial shapes, and the physical skill of moving safely on snow and ice.
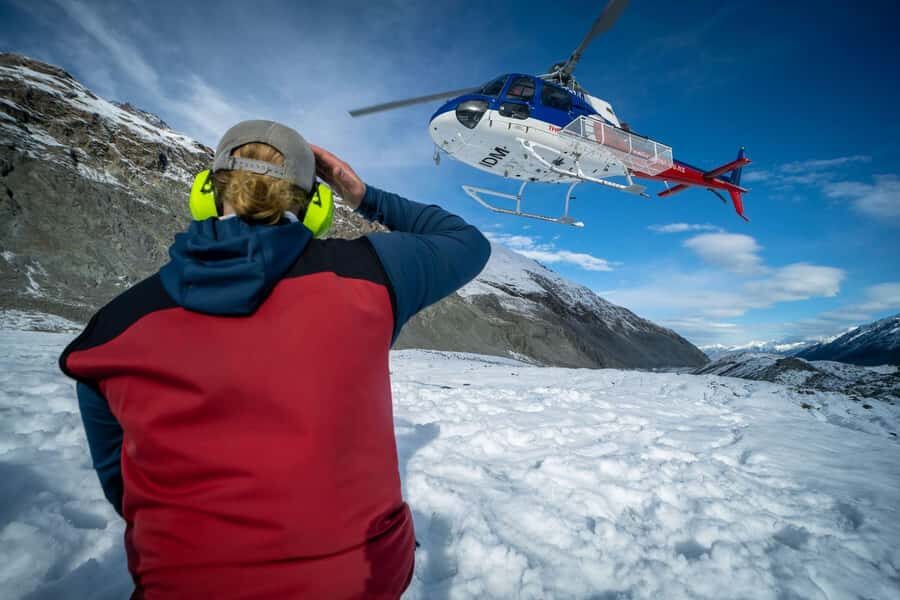
You’re also not left guessing. You’ll get a safety briefing before you go, then get fitted for glacier boots and crampons. Reviews repeatedly highlight how smoothly the ground crew and guides run the process and how safe it feels when you follow instructions.
You can also read our reviews of more tours and experiences in Aoraki Mount Cook Village.


Mount Cook airport to the glacier: the flight portions and views
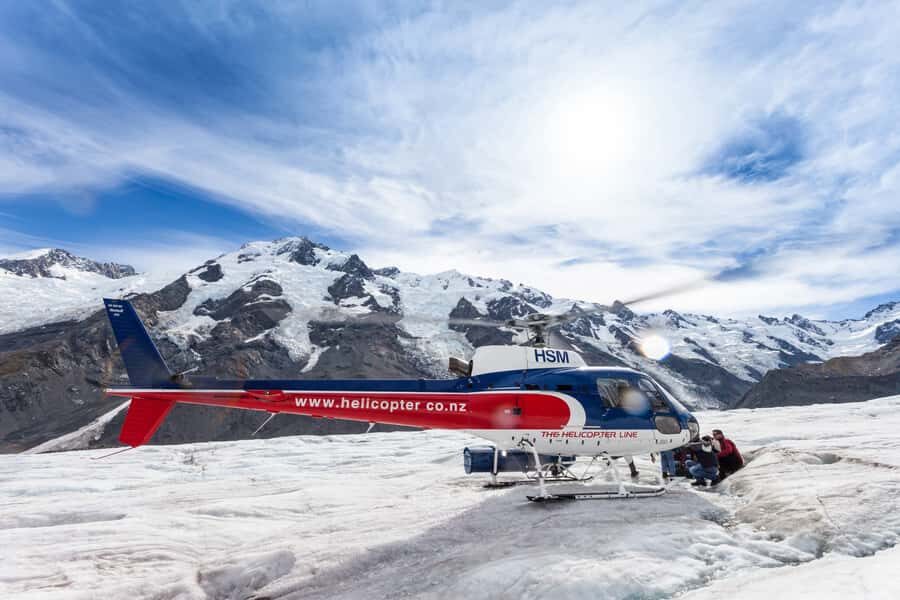
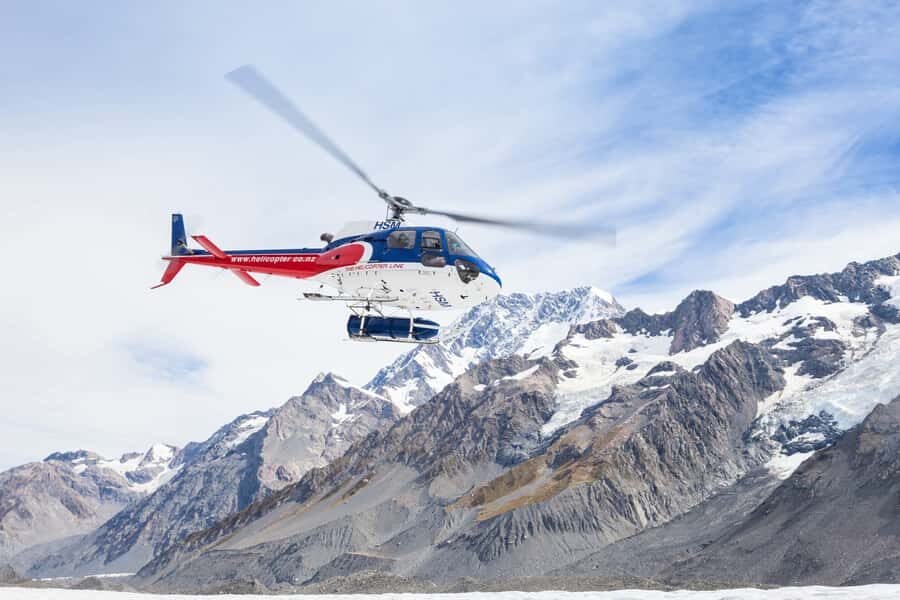
Your total time is about 3 hours, and it follows a simple rhythm. You check in at the office upstairs in the airport, then you’ll get a 20-minute safety briefing before boarding. The helicopter leg is short but scenic, roughly 15 minutes over glacial scenery and the surrounding peaks.
On the way to the ice, you’ll fly over the Tasman Glacier Lake area and ice formations. This matters more than you might think. From the air, you understand where you are before you land. When you’re later on the ice, it’s easier to connect what your guide is pointing out to the shapes you saw from above.
The return trip is built for perspective too. You fly close to the Hochstetter Icefall on the eastern face of Aoraki (Mount Cook). That aerial angle can be stunning, especially if visibility is good and clouds aren’t sitting low in the valley.
The 2-hour heli hike: what the glacier walk feels like
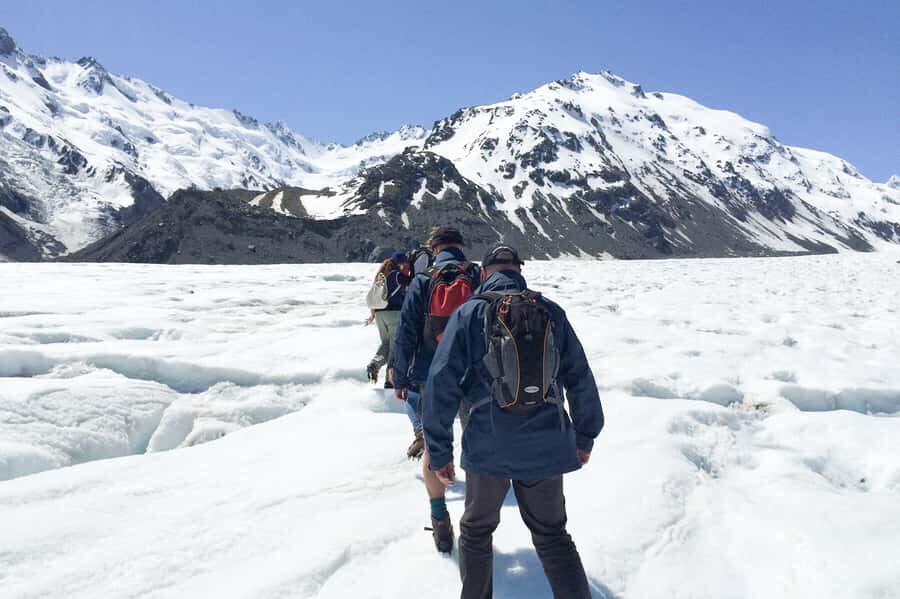
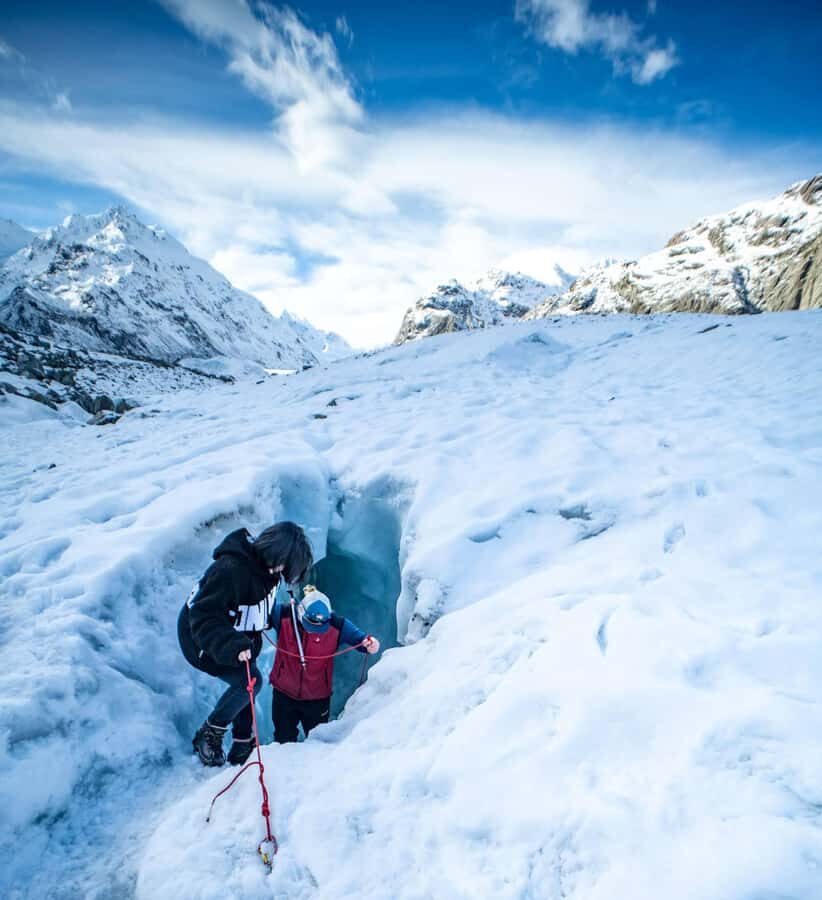
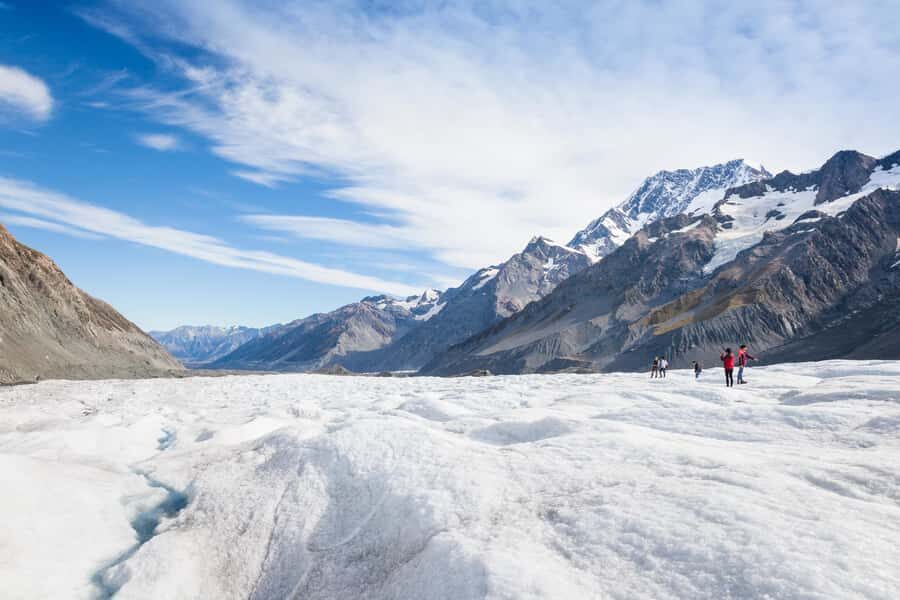
Once you land, the day shifts from sightseeing to work. The hike is about 2 hours and on undulating glacier terrain in the shadow of the Southern Alps heavyweights, including Aoraki and Mount Tasman. Expect uneven ice, snow over ice, and the need to move with care.
You’re given glacier boots and ice crampons and you’ll learn how to walk in them. That’s not filler. Several reviews stress how guides coached people on safe movement, and how they stayed attentive if someone looked tired or off-balance. It’s the kind of guidance that turns a scary idea into a controlled experience.
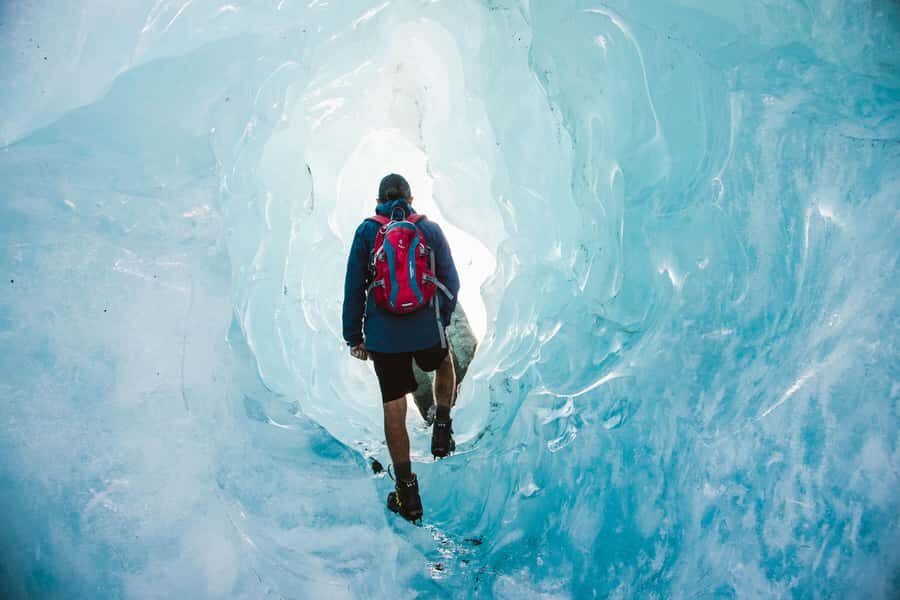
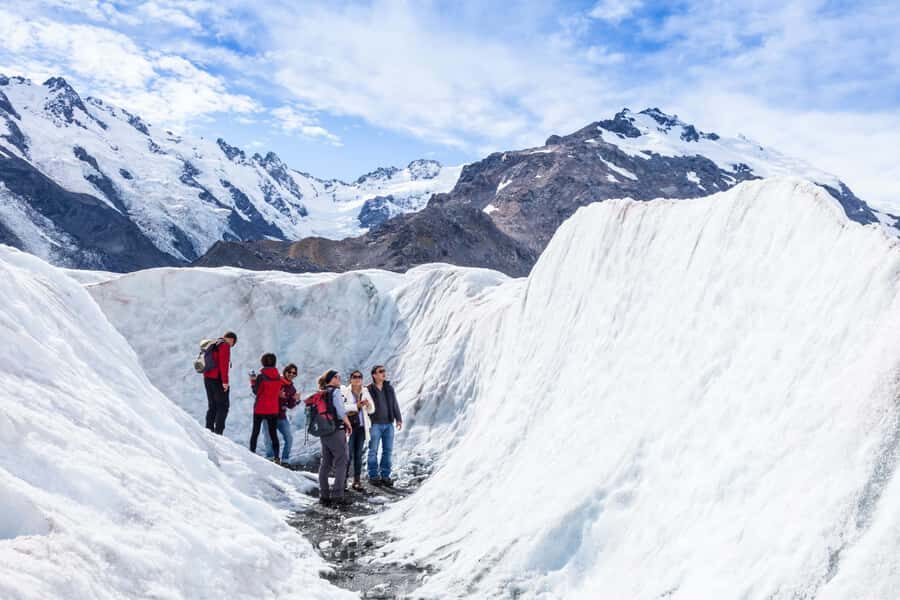
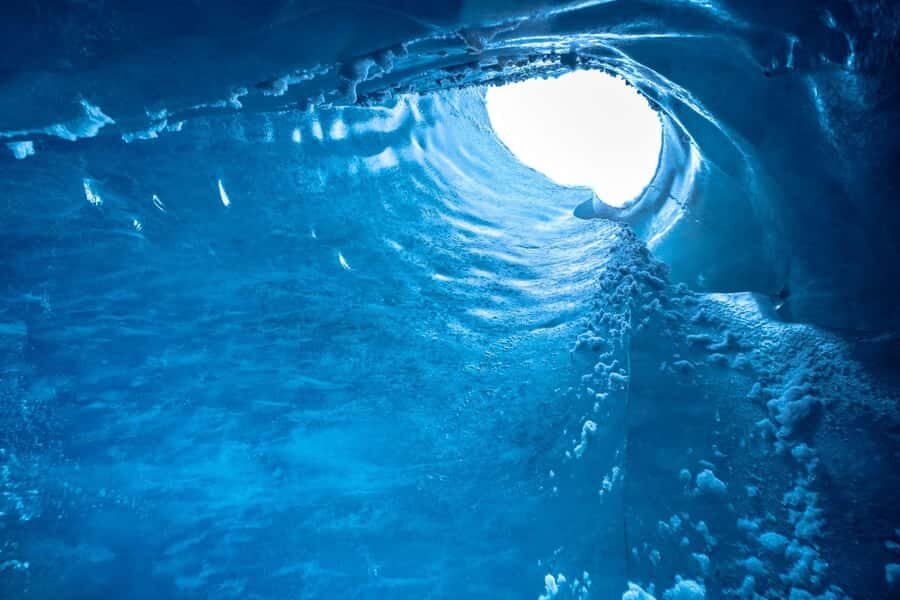
What you see on the ice can vary by conditions. Some days, you may explore ice caves or distinct formations. On other days, recent snowfall or weather history can limit access to certain features, so the route focuses on what’s safest and accessible. Either way, you’re still on the glacier and the scale is the real wow.
Also, this is a hike. Even though it’s guided and equipment helps, you’ll still feel it in your legs and feet. If you’re the type who expects a gentle walk, you may feel the “hike” part more than you planned for.
Guides, gear, and timing: where most of the value is
In glacier travel, the gear and the briefing make or break the day. Here, everything is handled for you: glacier boots, ice crampons, and a waterproof jacket if required. You don’t need to rent or hunt down specialty items. That alone helps justify the price, because the hard part is getting the right equipment and fitting you properly on-site.
Timing is the other big value driver. Your requested time is your check-in time, but you should plan for at least 45 minutes after check-in to cover the safety briefing and getting fitted for gear. That’s important because helicopter operations run on tight schedules, and a rushed start never helps anyone.
I also like that the group size is kept small, limited to 10 participants. Smaller groups usually mean less waiting during fitting and more ability for guides to give hands-on help. Reviews repeatedly mention how organized the staff are during the fitting and boarding process, and how calm the day feels when everyone follows the plan.
Weather and how your ice experience can change
This is the part where you need realistic expectations. The helicopter flight is subject to favorable weather conditions and minimum passenger numbers. If conditions don’t cooperate, you’ll be offered an alternative date or a full refund.
Even when the day runs, snow history can change what’s practical on the ice. One review described limited glacier features due to heavy snowfall the days beforehand, so cave access and details were reduced. Another described getting to explore a bigger ice cave, which suggests conditions can open up different exploration options.
So think of it like this: you’re booking the heli-landing + guided crampon hike experience, not a fixed checklist of ice caves. If the day’s weather allows it, you’ll likely see more variety. If it doesn’t, you’ll still hike the glacier and learn what’s happening on it.
Price and value: is $564 worth it?
At $564 per person, this isn’t a budget activity. But it also isn’t just a helicopter ride you could replicate with a short scenic flight. You’re paying for three expensive ingredients all together:
- Helicopter access to the glacier with landing
- Guided glacier time on ice, including equipment and active instruction
- A managed safety system for a terrain that’s not forgiving
When I judge value, I look for whether the experience is controlled and repeatable. Here, the structure is clear: briefing, fitting, heli out, 2-hour hike, and heli back with a close view near Hochstetter Icefall. Reviews also repeatedly mention smooth helicopter rides and strong safety practices, which signals that you’re not just handing your day to weather and hoping.
Also, you avoid the common “transfer tax.” You’re picked up and dropped off in Mount Cook Village, and you’re starting from the airport. That keeps the day focused.
If you’re the type who values once-in-a-lifetime access and hands-on glacier learning, the price starts making more sense. If you’re just chasing a photo and you don’t want to work your legs on ice, there are cheaper glacier viewing options elsewhere in New Zealand.
Who this heli hike is best for (and who should skip it)
This is designed for people with at least moderate fitness and hiking ability. You’ll be walking on ice with crampons, and fatigue will show up. If you’re generally active and comfortable walking on uneven ground, you’ll probably find this doable.
There are also clear limits:
- Minimum age is 10 years old
- Maximum weight limit is 150 kg per person, including equipment
- It’s not recommended for people who are pregnant
I’d also add a mindset tip. Bring curiosity and patience. Glacier walking is about following cues, not power-walking to the next view. If you treat it like a guided hike with safety rules, it goes smoothly.
How to prepare so the day goes your way
Even with equipment provided, your choices matter. The essentials:
- Wear comfortable shoes and sturdy closed-toe footwear
- Bring warm clothing
- Have rain gear, since New Zealand mountain weather can shift fast
- Consider sunscreen and sunglasses for the brightness on snow and ice
You’re also not allowed drones, selfie sticks, or tablets/iPads. Plan your photo setup accordingly. If you’re used to filming while walking, you may need to adjust. With crampons on, slow and steady beats aggressive angles.
One practical note from real-world experience: there are multiple operators in the airport building, and you’ll want to look carefully for the correct office location. Since the meeting point is upstairs, plan a little time to confirm the signs before you rush.
Photos and memories: what to aim for
This is one of those trips where you get photos in three phases.
First, the helicopter views. You’ll see the Southern Alps, lakes, and ice formations from above. That’s where your wide shots happen.
Second, the glacier landing. The textures of the ice and the scale of the environment look different up close than they do from a lookout.
Third, the return flight near Hochstetter Icefall. If the sky cooperates and you get good visibility, the icefall views can be the kind of shot that makes other glacier photos look flat.
Also, if you’re lucky enough to access ice caves on the day you go, treat it like a guided classroom as much as a photo stop. The safest and best memories come when you listen first, then shoot.
Should you book the Mount Cook 3-hour Heli Hike to the Tasman Glacier?
Book it if you want a real glacier experience with guided safety, small group attention, and the unique thrill of helicopter landing on the ice. This is ideal for active adults and families with older kids who can handle a moderate hike on crampons for a full 2 hours.
Skip it or reconsider if:
- You’re mainly looking for a low-effort walk
- You’re sensitive to uneven terrain and cold, even with gear provided
- You’re traveling when you can’t be flexible if weather forces a date change
If you can handle the basics and you’re excited by ice walking, this is the kind of New Zealand day that becomes a benchmark. The helicopters get you there fast, but it’s the guided glacier time that makes it worth the money.
FAQ
How long is the Mount Cook heli hike to the Tasman Glacier?
The total experience is about 3 hours, including a safety briefing and about 2 hours of hiking on the glacier.
Where does the tour start?
The meeting point is at the operator’s office upstairs in Mount Cook Airport. Hotel pickup and drop-off in Mount Cook Village are included.
What’s included with the activity?
You’ll get a scenic helicopter flight, glacier landing, a guided 2-hour glacier hike, professional guides, and all equipment such as glacier boots and ice crampons. A waterproof jacket is provided if required.
Is the helicopter flight guaranteed?
It’s subject to favorable weather conditions and minimum passenger numbers. If it’s canceled, you’ll be offered an alternative date or a full refund.
What should I bring and wear?
Bring comfortable shoes, warm clothing, and rain gear. Sunscreen and sunglasses are also recommended, since conditions can be bright around snow and ice.
Are drones or selfie sticks allowed?
No. Drones, selfie sticks, and tablets/iPads are not permitted for safety.